Wednesday, December 7, 2016

A Year in a Day 12x12 Scrapbook


Get ready for 2017!  
Create 12 two-page layouts - one for each month.  Just add photos and journaling!


Easily integrated with Project Life to include MORE photos.

Included in the class:

  • 13 page protectors
  • All products (plus some extras to take home) to create the pages
  • Light lunch, snacks, bottled water, & Keurig!
  • Optional add-ons - add striped or faux leather album for your pages

Date:    Saturday, December 31, 2016
Time:    9am - 2pm
Place:   Ink-n-Stamp Studio in Glasgow, KY (contact me for directions!)
RSVP:  Monday, December 26th


This is a GREAT Christmas present.  Make sure to send my contact info to your loved ones!


Class Options


Tuesday, November 22, 2016

Hello December 2016

Let's bring in December with some creative fun!


Create an Advent Tree (about 2' high & 1½' tall) and eight cards using the Project Life by Stampin' Up! 2016 Hello December card kit and collection. Class designed by Stampin' Up! demonstrator Erica Cerwin.

Class includes:• 24 White 3" x 3" boxes (for the advent tree)• 2016 Hello December Project Life Card Collection (keep the extra product)• 2016 Hello December Project Life Accessory Pack (keep the extra product)• Additional supplies & tools to complete the nine projects• And, ~GASP~, No Stamping. We are using the items in the Project Life kits.

This class would normally be $74. However, with Stampin' Up!'s Extravaganza promotion, the class is reduced to $56

Please bring the following items to class:• Paper Snips (scissors)• Paper Trimmer• Dimensionals*• Glue Dots*• Fast Fuse*


RSVP by Sunday, November 27th!

*Adhesive also available, in limited quantities, for purchase at class.

Monday, November 21, 2016


Every girl needs some diamonds and pearls!

Today through November 28th, receive a FREE package of rhinestones or pearls with every $50* purchase.  Make sure to use the Host Code.

Here are some goodies available TODAY ONLY with some REALLY great discounts!


Click here to go to the sales section of the store!

Check out some projects on my Pinterest Boards using the Gift Bag Punch Board and the Gift Box Punch Board.


Saturday, October 1, 2016

Designer Tin of Cards Kit

Super awesome Designer Tin of Cards on SALE today through October 5th.  

Here's a video Stampin' Up! put together to help with the instructions and shown by Brandi Barnard:


Here are some additional photos of the kit.


Note that the supply list in the catalog is incorrect.  Supply list below is correct:


Anyone want to get together with the kits and have some fun?  Message me to set-up a Private Class.  Each person purchases the kit, I'll bring the additional supplies!


World Card Making Day 2016!

Hi Everyone!  Here's a quick video from Stampin' Up!  

Who loves happy mail?  I sure do.  A cute little card in the mail makes me smile.


Share with me your card creations.  I'll choose some winners and send an assortment of handmade cards.  


World Cardmaking Day Specials!

YAY!  It's World Cardmaking Day!  And Stampin' Up! has ALL sorts of goodies for us.  


And there's MORE!  Designer Series Paper is on SALE!  It's a great time to stock up - especially for some of those Christmas projects.


Stay tuned for more goodness today!  


Friday, September 30, 2016

Scarecrow by Shelly Peck

I so love these cookie cutter critters!  Halloween, Fall, Christmas, Winter - so many cute stamps!

The card I received as a swap was created by Shelly Peck.  I had to do a little search for the Designer Series Paper and the leaves.  I never noticed the leaves in the Jar of Love Stamp Set.  I need to get that one out and play some more!


Instructions:
  1. Fold 8½" x 5½" Delightful Dijon cardstock.
  2. Stamp scarecrow with Basic Black ink on scrap Crumb Cake cardstock.
  3. Color scarecrow with markers; punch scarecrow.
  4. Stamp leaves with Delightful Dijon ink on 2½" x 2¾" Whisper White cardstock.
  5. Emboss 4" x 5¼" Chocolate Chip cardstock.
  6. Adhere lace trim to the bottom; adhere to card base.
  7. Adhere 3¼" x 3½" Designer Series Paper to the top of the card.
  8. Layer stamped Whisper White on top of 2⅝" x 2⅞" Chocolate Chip cardstock; adhere to card base.
  9. Adhere scarecrow to card.


Supply List below:


Wednesday, September 28, 2016

Star of Wonder

This elegant card was created by Jeanne Nielsen.  Another swap I received.  

I love this card for the simple and elegant look that is just gorgeous!


Instructions:
  1. Fold 4¼" x 11" Smoky Slate cardstock.
  2. Stamp sentiment with Versamark and heat emboss with copper embossing powder on 3⅝" x 4⅞" Whisper White.
  3. Stamp swirl with Smoky Slate ink on Whisper White.
  4. Cut star with framlits from Copper Foil sheet; adhere to Whisper White.
  5. Adhere Whisper White to 3¾" x 5" Basic Black; adhere to card base.


Supply List below:


Monday, September 26, 2016

Mummy Jar By Hattie Walker

A most awesome MUMMY jar by Hattie Walker.  I got to meet Hattie on the Mediterranean Cruise in May.  We were at the same wine tasting table.  :) 

I love this card because I can reproduce it quickly and easily.  OR, maybe I should convert it to a treat bag?  I think I'll try that soon!


Instructions:
  1. Fold 8½" x 5½" Smoky Slate cardstock.
  2. Stamp sentiment with Basic Black ink on 4" x 5¼" Perfect Plum cardstock.
  3. Stamp Mummy Jar with Perfect Plum ink on Whisper White cardstock; cut with framelit.
  4. Cut Smoky Slate circle with framelit.
  5. Cut Designer Series Paper 4" x 2", 4" x 1½", and 4" x 1"; punch end with Triple Banner Punch.
  6. Stagger the punched ends and adhere together.  Tie Basic Black baker's twine around the Designer Series Paper.
  7. Adhere Designer Series Paper assembly to Perfect Plum cardstock; trim the ends flush with the cardstock.
  8. Adhere Smoky Slate Circle and Mummy Jar to Perfect Plum cardstock.
  9. Adhere Perfect Plum cardstock to Smoky Slate card base.


See below for supplies!


Tuesday, September 20, 2016

Joy to the World!

As soon as I saw the ribbon and sequins, I KNEW I wanted to create a Christmas card with these alternate colors!

I watched a live video by Sara Douglass, Stampin' Up! CEO, showcasing her daughter's birthday card.  She heat embossed gold on Gold Foil.  It was amazing!  Then I thought - what if I used an embossing folder with Silver Foil.  And WOW!  I love it!


A little tip with the sequins - use the Fine-Tip Glue Pen to place dots of glue.  Then add the sequins on top of the glue.  Set aside to dry.


Supply list below:

What other alternate colors do you like to use for Christmas cards instead of the traditional red and green?  Leave some comments and let's have some fun!  I'll work to create some fun new Christmas cards with your color combination suggestions.


Monday, September 19, 2016

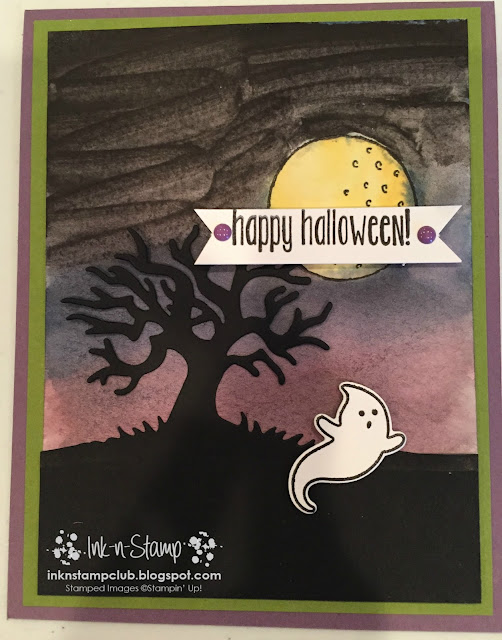
Happy Halloween Scene

Driving home after my son's marching band practice, and I caught that twilight / dusky phase with the trees really dark and some bats swooping down to grab some bugs.  This came to mind.  

However, I will admit, my first attempt was NOT pretty at all.  I still had some kinks to work out.


For instance, I do not recommend watercoloring with the Basic Black Archival Ink Refill.  See the swirls?  Yuck for this project!  

Also, my moon was a little blendy with the sky.  Rule number one of watercoloring - let the previous layer dry completely if you do not want the colors to blend!

My other thought was that the ghost is just floating along - where did he come from?  Maybe he needs to ~rise~.........


So here is my second attempt. 


To watercolor the background, I used my aquapainter, watercolor paper, and a couple of drops of Perfect Plum reinker.  I washed that over all the paper.

Then, I added Night of Navy ink with my aquapainter.  At the top of the paper, there was more ink.  As I worked down the paper, I added more water so that the colors faded and blended into each other nicely.

Last, I added the Memento Black.  This is water-based and works much better for the look I want.  I applied this similar to the Night of Navy.

The ghost and the sentiment are both popped with dimensionals.


Supply List:


Hope you enjoyed!


Saturday, September 17, 2016

Swap Swag!

With each catalog release, I participate in a swap with a business building group.  What's a swap?  I'm glad you asked!

A swap is where you create projects according to the criteria published by the host.  The ones I participated in were card swaps.

Generally, the host of the swap gets one of your projects.  Good swap hosts create something special for each participant.  

This is a super cute and fun little treat created by Carol Hickman, our swap hostess-with-the-mostess!


She used the new 2" x 8" cello bags from the annual catalog.  I just love the festive design!  I have not yet purchased this bundle.  But guess what.  I need it now!  :)

Supply list shown below.


Friday, September 16, 2016

Special Offers September 15 - 21

Some really great deals this week on Project Life.  Have you thought about doing something with all those photos on your phone or camera?  This is a simple, easy, fast, flexible, and beautiful way to preserve those memories.

But it's not just for scrapbooking and memory keeping.  There is so much more you can do!


And here's the EXTRA special offer.  

Purchase the Hello Lovely card pack and accessory kit, and I will send you a class kit for the Hello Lovely with color instructions FREE!  Click here to check out the Special Offers page!  

Here is a peek of one of the cards in the kit.

Extra items you will need in addition to the Hello Lovely pack and accessory kit:

  • Early Espresso Ink
  • Paper Trimmer
  • Mini Glue Dots
  • Fine Tip Glue Pen
  • Dimensionals
  • Scissors
All other items will be included in the card kit or are available in the Hello Lovely packs.

Have a bunch of friends that want to get together?  Contact me and we can set-up a private class with these packs.  


NEW Clearance Rack Items!

WOW is all I can say!  So many goodies at fantastic prices!


Click on the "Shop Now" button above and click on the clearance rack - or just click here to go straight to the clearance rack.

Some things have sold out, so hurry to get a great deal!


Thursday, September 1, 2016

New Holiday Catalog is LIVE!


Here's a card I created using the Jolly Friends Bundle, Cable Knit Embossing Folder and the Warmth & Cheer Designer Series Paper Stack.


Need a catalog?  Just comment or message me and I will mail one!